|
Risers, Toggles & Sliders
Risers
The angle of incidence of a canopy is set by the suspension
geometry (we often call it the "line program") as measured
from the bottom of the canopy, through the keel or flare,
including lines, connector links and risers, down to the "node"
point of the risers that is, to the point where the risers
"split" into front and back risers, just above the 3 ring
confluence wrap.
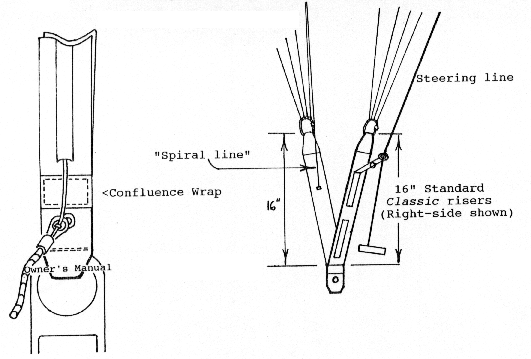
The suspension geometry of the Classic is based on
16 inch (40 cm) risers, measured from the top of the riser
to the top of the confluence wrap. If you use longer risers,
the center of gravity will move forward. The canopy will fly
more nose down, and will be more difficult to stop. If you
use shorter risers, the center of gravity will move aft. The
canopy will fly more nose up, stalling with less brake deflection.
Risers are considered part of the harness, and are provided
by your harness/container manufacturer. Therein lies a potential
problem. If your system comes with very long (20") or very
short (12") risers, your Classic will not fly as designed.
The maximum variance from the 16" riser length figured into
your Classic line program is plus or minus 2 inches
(+/ 5cm).
This means you can use a riser as long as 18" or as short
as 14" and it shouldn't significantly degrade your performance.
But to get the optimum performance, you'll want to use a 16"
riser. Your harness/container manufacturer may build
risers in various sizes, or a master rigger can modify your
existing risers, or you can purchase factory standard 16"
risers from Eiff Aerodynamics.
Figure 6 - Classic Risers:

Referring to Figure 6, note that the steering ring is mounted
on a third, "flying" mini riser. Many accuracy jumpers believe
this geometry provides a superior feel for the canopy. How
much this mini riser "flies" off the main rear riser can be
adjusted, simply by sewing it down progressively higher on
the main riser, up to just below the ring itself. Typically,
the mini riser is between 4" and 8" long, and may extend beyond
the connector link, depending on the riser length and your
reach.
Please keep in mind that any canopy, including the Classic,
is sold "links up." The risers, deployment bag, bridle
and pilot chute must be compatible with the container system
you jump, and must comply with the manufacturer's instructions.
Check with a FAA rigger before you install any risers or other
components that are not original equipment on your system.
Toggles
Steering toggles is an oft debated issue, one that boils
down to personal preference. If you have jumped soft toggles
all your life, it may be difficult to switch over to hard
toggles, but you should try. One reason is that soft toggles
require a deployment brake "cat's eye" to be sewn into the
steering line, usually at 12" to 16" up the steering line
from the soft loop steering handle right where you will feel
it "bump" against the steering ring again and again, as you
maneuver your Classic at 40% to 80% brakes on the final
approach phase of flight.
Deployment "lanyards" can be sewn into the steering line
far enough up that they won't foul on the steering rings,
enabling you to use soft toggles (or for that matter, hard
toggles) but this is not a standard feature and you will have
to request it.
By far, the most common toggle used by Classic pilots
is the hard toggle, and many use one with a slightly offset
hole, which positions the steering line to emerge comfortably
between the index and middle finger, and tilts the hands "thumb
high" while in brakes, a more ergonomically efficient
position.
A custom designed hard toggle with offset steering line hole
is available as an accessory from Eiff Aerodynamics. Assuming
you use it, or a similar hard toggle, we strongly recommend
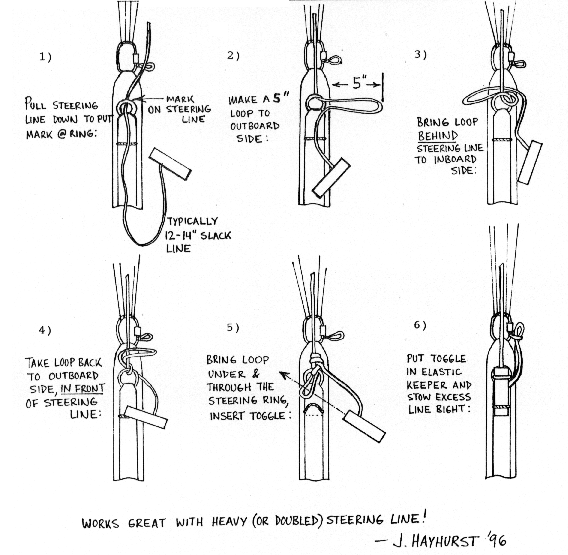
you learn to use the "Justin Schilling" knot to set your deployment
brakes. Find a Classic pilot to show you the knot.
It is far superior to "daisy chaining," especially if you
use 1'doubled" or other heavy weight steering lines. The sequence
of tying the knot is shown on the following page, figure 7.
Once again, remember that whatever toggle and deployment
brake system you pick, make certain your rigger has inspected
it, that it is compatible with the harness/container manufacturer's
design and meets all instructions supplied by the manufacturer!
Figure 7 - The "Justin Schillinq" knot

Justin Schilling was on the U.S. Team in 1982, '84 &
'86 a superb athlete and a great sportsman. Thanks, Justin!
Sliders
The Classic comes with a large D ring slider. This
gives the canopy a comfortable opening shock, even at style
airspeeds, and allows you to pull the slider down over the
risers and stow it behind your head (less flapping and better
forward speed). Once the canopy is open, you may find that
you have to reach up and grasp the rear risers at the top,
pumping the slider down the final few feet to the top of the
risers.
Putting your hands up on the rear risers after opening is
a good habit to get into it allows you to make a quick rear
riser turn to avoid any canopy that threatens your airspace.
(Yes, you can jump your Classic on relative work jumps!)
Once you have the slider down, leave the deployment brakes
set while you make your accuracy "nest" (adjust your harness,
stow goggles, etc.).
Now release the toggles, push them up through the D rings,
and pull the slider down the risers to eye level. Grasping
the center of the slider in front of your face with both hands,
twist it with a forward "wringing" motion into a tight roll,
then stow it behind your head. Now you are ready to shoot
some accuracy!
If accuracy is not your game, and you chose the Classic
because it is a safe and delightful alternative to high
speed canopies, and because it makes a great demo canopy,
then you may not want to bother with a big D ring slider.
A standard or split slider with stainless steel grommets is
available as an option. The same goes for all the "serious
accuracy" features that are standard on the Classic if
they don't suit your needs, if you want spectra lines,
soft toggles, a split slider and 1" risers, Eiff Aerodynamics
will be glad to set up your canopy that way!
Close Page |