| Lay your Classic
on a clean surface with the leading edge , (nose) facing
the floor, and the trailing edge (tail) on the top.
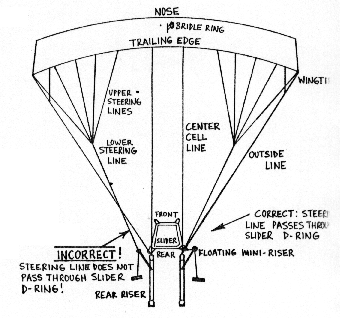
Locate the rear connector links. Fasten these to the
rear risers. The outside line (goes to wingtip) should
be on the outboard side of the link, and the center
cell line should be on the inboard side of the link.
No lines should cross each other.
The slider should already be on the lines, properly
oriented. If you are not sure of this, have a rigger
check it out. With the slider on correctly, thread the
steering line through the slider D-ring (or grommet),
then thread it through the steering ring on the rear
riser, and tie off your toggloes securely on the lowest
mark on the lower steering line. |
 |
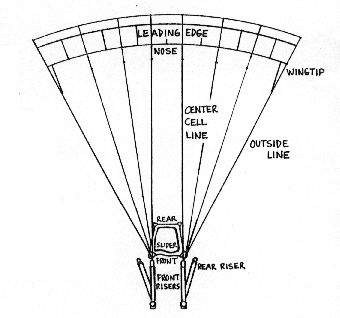
| Turn the parachute over
so the leading edge (nose) is face up, and the front
risers are facing up, with no twists in the rear lines.
Locate the front connector links and fasten them to
the front risers. The outside lines (go to the wingtips)
must go to the outboard side of the link, and the center
cell lines must go to the inboard side of the link.
No lines should cross over any others.
Read the harness/container manufacturer's instructions
and make sure you have complied with any unique requirements.
We recommend you take your Classic outside in
a breeze and inflate it at this point. Make sure you
have "continuity": the lines are straight, with no twists
or crossing of any kind. If in doubt, check with your
rigger. When you are certain your canopy is mated to
the harness correctly, use a wrench and carefully tighten
the connector links. The barrel should thread snugly
against the barrel stop, then tighten one quarter turn
more DO NOT OVERTIGHTEN! Over tightening the connector
links can strip the threads or crack the barrel. Inspect
each link carefully for signs of damage which could
reduce structural integrity. |
 |
| Install your bag, bridle,
and pilot chute, using the bridle attachment ring on
the top of the center cell. Attach the risers to the
harness/container in accordance with the manufacturer's
instructions.
Pull the slider down by the connector links. Using
the packing tabs, flake the canopy and lay it on the
left side. Be sure all the lines are taut. Fold the
nose back on top of the canopy approximately 10 inches
as shown. You can vary the amount of fold to tailor
your openings. More than two folds may cause excessively
long (sniveling) openings. |
 |
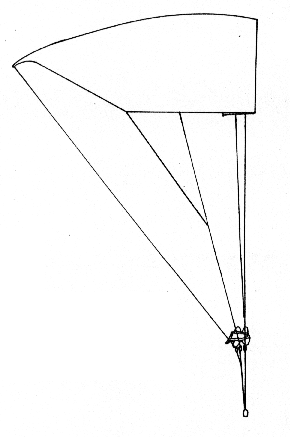
| Grab the "B" line group
at the top of the canopy and place it on top of the
"A" line group. Be sure to keep tension on the line
groups while packing to keep the lines straight. |
 |
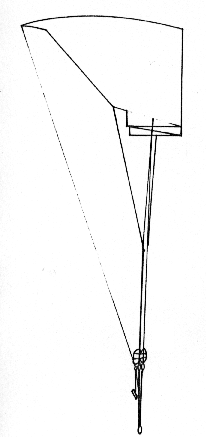
| Fold the "C" line group
on top of the A & B groups. Keep tension on all
lines. |
 |
| Fold "D" line group on
top of A/B/C groups, being sure to keep lines taut. |
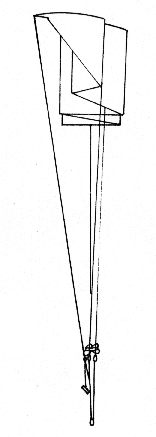 |
| Split the tail of the
canopy in the center as shown, so the right and left
steering lines are on either side. Clear the wingtips
on both sides. Leave them out for normal openings; fold
them for slower openings on high speed jumps.
Set the deployment brake lines according to the manufacturer's
instructions. (See figure 7 on page 23.) If you are
jumping a canopy with deployment brake lanyards, bring
them down through the slider D ring and then through
the steering ring on your riser. Be sure this line does
not wrap around any other line. Insert the toggle
through the lanyard loop and stow the toggle on the
riser. Stow excess steering line in a rubber band on
the connector link. |
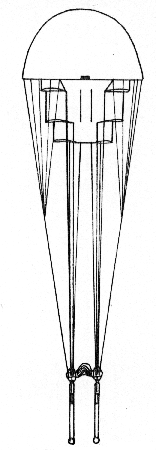 |
| Flakes the tail on either
side so the center cell remains in the middle. Be sure
to keep all steering lines taut. Pull the slider up
to the skirt of the canopy until it rests against the
stops. |
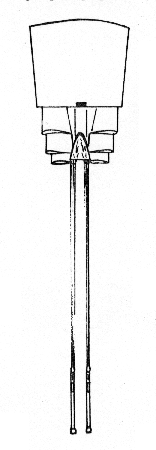 |
| Bring the center of the
tail down so it is even with the bottom of the canopy.
Cocoon the tail to bag width. |
 |
| 
Grab the lines near the slider and make one stack as
shown above, keeping the D rings and slider in the same
relative position. The fold should be about 2/3rds of
the length (mouth to grommet) of the bag. |
| 
Grab the top portion of the canopy and fold it over
on top of the previous stack. |
| 
Insert the stacked canopy into the bag. Be sure the
bridle is pulled snugly so that the ring on top of the
canopy can be seen against the grommet at the top of
the bag, and the area is free of any fabric. |
| Proceed packing according to the
container manufacturer's instructions.
Close Page |