Fundamentals of Accuracy Equipment1. Parachute: Congratulations, you have chosen the finest! 2. Harness: Don't waste jumps. Get "set up" properly in a suspended harness on the ground. Your harness should be snug, symmetrical (hanging evenly left/right), and a plumb line dropped from your chin should pass abeam your insteps meaning that you are hanging upright, not leaning back. Select a harness with diagonal straps or a container design that forces you against the chest strap and main support webbing (figure 3, below). 3. Jumpsuit: Fabric should be snug from knees to ankles. No loose material blocking your view of shoe or heel. 4. Shoes: The heel should be flat and well defined, with a maximum radius of 3cm. The rear strike point should be visible, not hidden under the heel cup. Find a veteran accuracy jumper and ask him where he has his shoes modified, and get yours done in similar fashion. A good shoe is to accuracy what a good putter is to golf. Make sure you have one that works for you! 5. Toggles & Gloves: We recommend hard toggles with an offset hole (available from Eiff Aerodynamics as an option). Combined with thin leather gloves, this will provide you with optimum ergonomics and "feel" for your Classic. 6. Glasses & Goggles (Vision): You need 20/20 vision to shoot good accuracy. You should see the pad at around 1000 feet. If your eyes water excessively, wear goggles many top accuracy jumpers do. If you wear glasses, you'll want to wear goggles on rainy or misty days. It's hard to see through water spots! Figure 3 - Harness Position:
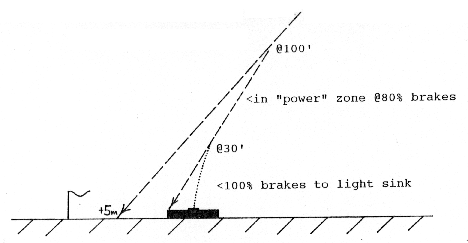
B. Pattern1. The Basic Flight Pattern (see figure 4a & 4b): Figure 4a shows a plan view of the flight, from opening to final approach. Maneuver as desired (crabbing, S turns, holding and running) but stay fairly close to the windline. It's basic, but the times you don't are jumps that go bad. Plan your maneuvering to position yourself for a windcheck at 1000 feet. The stronger the winds, the further upwind this check must occur. Hold into the wind at half brakes and check your Classic's penetration at 1000 feet. Half brake airspeed, with your hands at "ear level," is about 7m/s (16mph). Use this information to gauge the winds. For example, if your groundspeed is zero, the winds are 7m/s. Consistently make this check and you will soon become proficient at estimating the winds you'll face on final. Now turn downwind at half brakes. Start your base turn so as to end up behind the target at the correct angle for the winds. Figure 4b depicts "set up" points based on a starting altitude of 300 feet for your final approach. Also shown is a shorter "European" style (approximately 100') final. If the winds are strong, start your approach well upwind of the target, sliding sideways into position only slightly behind the target. Figure 4a & 4b - Pattern and Angles: 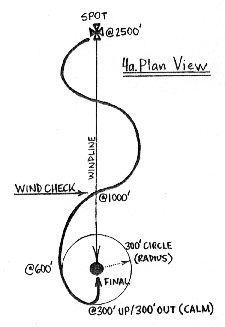 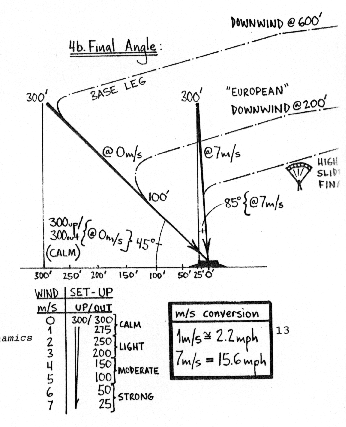
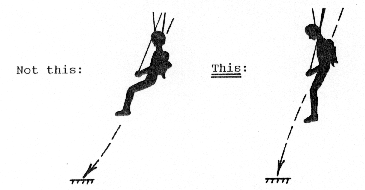
The Classic ApproachThe "Classic" parabolic or "round off" approach was invented long before the Classic, but the Classic makes it a snap to fly. Complete your base leg to final turn so as to pass through the first "window" of your final approach, the "set up" described at figure 4b. Spend the next 200 feet (about 20 seconds) working to achieve a glideslope that will carry you beyond the target to +5 meters, at 66% brakes. Work hard be a pilot, not a passenger. If you are high, try S turns, sustained deep braking, or tap in and out of light sink to get down. Avoid stalling the canopy; it's unsafe and will only confuse matters. If you are low, let up and fly at 25% brakes. Keep correcting until you have both 66% brakes and a glidepath that will overfly the target. As you approach 100' you are about 10 seconds from landing The "European" or short final approach intersects your glidepath at this point, completing a curving downwind approach that aims to pass through the same "window in the sky" you are now flying through. It's time to aim a little closer to the pad, which you/ do by increasing brakes to 80%, hands level with your sternum, forearms about 30° above a horizontal position (see figure 1).' This is the "power zone" the canopy is flying, your control pressures firm, and the canopy responds in linear fashion to your inputs. Let up, and you move forward. Push down, and you slow down, steepening your angle of approach. You are flying to just beyond the pad, aiming at the far side of the tuffet, about +2.5 meters (+78 feet) beyond the dead center. You are approaching the third and final "window" of your final: the transition point. "Transition" simply means transitioning from your slight "overfly" glidepath, increasing your braking, steepening your angle, and aiming for the dead center dot. If you've flown your approach well, you'll arrive at 100% brakes, or very light sink. The canopy will remain stable, over your head, with no pre stall "rockback" or acceleration. This steep but controlled arrival is designed to maximize the accuracy of you~ foot placement. Figure 5 Transition:
Planning1. Always plan your jump. Base your plan on the conditions you observe at the DZ in the moments before you jump, plus an awareness of any trends. Your plan should be specific and clear in your mind visualize executing it yet have flexibility for unexpected changes. The process of planning is important: it prepares you, connects you to the here and now, and forces you to anticipate what might happen. Specific planning for a jump should begin about ten minutes prior to the jump, not earlier. If you fret for hours before a jump, you'll wear yourself out! 2. How to plan? First, learn to "read" a DZ. Locate the target, windsocks, flags, streamers, trees that reveal the wind, and so forth. Study terrain, note buildings and trees that will generate turbulence on particular approach windlines. Pace out the distance to prominent features, and note where an approximate 300' radius circle falls around the target. Study the DZ map, learn the cardinal headings (north, south, east, west), and talk to locals about typical wind patterns and exit points. You've "read" the DZ now "read" the conditions. Observe low level clouds, cloud shadow movement, jump plane drift and speed over the ground, the wind streamer, canopies in the air, and surface wind indications. Next answer these three questions: A Where is the exit point? B. What is the average wind velocity around 1000 feet? C. What is the surface windline and velocity? These questions inherently break your plan into three segments: A) Exit to your 1000' wind check B) 1000' to the base leg & turn to final C) Final Approach: from 300' to landing 3. Now, think through how you will fly each segment of your jump. For example, you might say to yourself: "Exit to 1000': I will exit over the end of the runway, then face west while stowing my slider and adjusting my harness. I'll stay near the windline, practice sinks and stalls to get comfortable with my Classic, then position myself just upwind of the target to do my 1000' wind check. I expect to move forward steadily at 1/2 brakes, because the winds are only 2m/s. "1000' to my turn to final: After the wind check, I will turn downwind and fly past the target at 600' up, offset 300' to the right side (left pattern) then turn base leg and play my turn to final to set up for 2m/s winds, at 250 feet back, 300 feet up. "Final: No thermals on final expected, but if I do hit one, I will S turn to lose any extra altitude I gain, then continue my approach. Watch for left slide in the transition (having seen some recent jumpers slide left of the pad and reach right). Make it smooth and deliberate at the end . . . focus on the dot!" ExecutionVisualization: We go to school to learn to read and write, we go to a university for advanced studies, or a trade school to learn a technical skill, but nowhere do we go to school to learn to use our unconscious mind. Using the mind correctly is as important as learning the strategies and techniques of accuracy. An easy chair is the place to read and digest the contents of this manual. At the DZ, you can "draw pictures in the dirt," or verbalize your intentions outloud in your mind. But during the crucial last seconds of the jump, you must have mental imagery of yourself flying down to the pad, guiding your heel to the dot. You must see it happen in advance, frame by frame! Programming: Pre programming yourself to handle expected conditions is a smart thing to do. Then, when it happens, you will react quickly and with assurance. When under canopy, fly your pattern for the winds you planned on, but with constant vigilance, knowing that conditions frequently change, that each jump is unique, and having confidence that you can and will negotiate the conditions however you find them. Below 300 feet, your flying must become progressively less "rational" and increasingly more "intuitive." In aviation, we call it "seat of the pants" flying. Whatever you call it, the closer you get to the pad, the less time you have for "mind talk" (verbalizing your perceptions and the correct responses in your head), and the more you need to "just do it." Below 100 feet, there is absolutely no time for mind talk! The conscious mind focuses on the goal (the yellow dot) allowing the unconscious mind to do the steering. Only experience will teach you the best responses to each situation, and early on you must learn to quiet your (verbal) mind, letting the unconscious mind learn to achieve success by trial and error. Let your rational mind go to work after the jump, analyzing what went well and what can be improved. But avoid judgmental comments or harsh criticism if you miss the mark! Imagine how you would destroy a baby's learning process if you criticized her for falling down! A child learns to walk via trial and error, and no one criticizes the child for falling down. Don't you owe yourself the same kindness and respect, after missing the target? What happens above 30 feet is not the most important part of precision ( measured in centimeters) accuracy. What happens below 30 feet ~s. There are many ways to navigate your Cl assic into a workable short final position. Learn a method that works for you, and stick to it, so that you consistently arrive at the "transition point" (that 30' short final window above and behind the pad) in stable flight and ready to go to work, shifting into intense "fine focus" for your flight down to the dead center. Starting OutIf you are new to the sport, you may have chosen the Classic because it is a great all around canopy, not for making precision accuracy landings. If so, you have chosen well: designed to operate in the slowest of flight regimes, the Classic is closer to the student canopies you have been flying than the fast, "high performance" canopies crowding today's market. And despite the draconian warnings we're required by law to present at the front of this manual, this canopy won't kill you if you make a simple mistake; the Classic is very docile, predictable, and forgiving. With a reasonable 1Om/s (22mph) forward speed, the Classic also makes a terrific demo canopy very stable even in turbulent conditions, and capable of flying steeply down to a landing in the tightest imaginable spots, with a sink rate that will allow for easy stand up landings. That's the name of the demo game! If you are new to the sport, and have chosen the Classic for its precision accuracy capability, you surely know it is the most advanced, state of the art accuracy canopy for the job. So what next? First of all, let us welcome you and invite you to join the small but enthusiastic community of accuracy jumpers here in the U.S. and Canada, or the large and very active community of accuracy jumpers in Europe and Asia. Now how to learn accuracy? In Europe and Asia, there are many clubs that focus largely on accuracy, and in the summertime, there is a big accuracy meet every weekend in Europe. It shouldn't be too difficult to find a club that will welcome you to their fold. In the United States and Canada, learning accuracy is harder there are currently only a few "hot beds" of activity. As a norm, many DZs currently have nothing to offer you. So where to begin? Eiff Aerodynamics suggests you begin by contacting ISSA, the International School of Style & Accuracy. Jim Hayhurst, Director of ISSA, will be glad to put you in contact with the nearest "accuracy friendly" DZ. ISSA also conducts seminars at several locations throughout the year, and hosts the "Arizona Classic" and other meets. You can write to ISSA at: 1405 Parkview Dr., Allison Park, PA 15101. E mail: 70774,[email protected] Precision accuracy is a lot like golf. The two games are remarkably similar; both are congenial games, played in a social milieu, yet both require intense focus and concentration. "Par" in accuracy is about one centimeter per jump, if you land on the 5cm dead center electronic pad. When you start, just landing on the 16cm radius pad is a ambitious goal, like shooting 15 over par (high eighties) in golf. So you may want to set a more attainable goa l at first, like breaking 100 in golf. Ten jumps in a row landed inside a 10 meter circle would be an attainable standard for a new A license parachutist jumping a Classic. Using the instruction offered in this manual, and jumping at your home DZ without any coaching, you will probably achieve the "10 ~ lOm" standard in less than 100 jumps. Attend one of the ISSA seminars, and you'll become proficient much faster. There are already some videos on basic canopy control available; ISSA will release its own video in late 1996, along with a book by Jim Hayhurst, Competition Style & Accuracy. If you decide to get serious about accuracy, you'll want to train at DZs that support precision accuracy, and have resources (people, equipment, airplanes) you'll require. Contact ISSA to learn if a DZ near you can offer you a good training environment. You have to go where accuracy is done, and jump with top jumpers. Watch and ask questions, get critiques, both verbal and video. You'll want to develop a training plan and set some goals, goals that will bring you personal satisfaction, and are within grasp. Here is an example of an ambitious yet achievable set of accuracy goals, if you are training with a Classic:
Everyone has a unique set of life circumstances; the one common denominator among fine accuracy jumpers is commitment. You have to share your commitment with loved ones, and keep work, family, and other priorities in mind as you embark on a training program. You'll always do better if you set realistic goals, and keep your life in balance. If you can, plan to attend at least one intensive 10 day training camp a year. You'll elevate your game quickly at a camp, and then you can maintain with weekend jumping at home. You need to compete, too to measure progress. Success in competition comes from making each practice jump at a high level of concentration, with the same intensity and focus as if it was a competition jump for "all the marbles." In competition, jump as you do in practice no more, no less. As much as possible, a competition jump should be "just another jump," with no more inherent value or importance than a training jump. Make each accuracy jump the jump of your life, and you'll find that competition holds no terror for you. Ultimately, accuracy is a game, a form of play, not too far removed from the playground of your childhood. (Which, by the way, is not a bad place to practice your foot placement.) Keep it in perspective, wish your fellow competitor only the best, and let each competition be an opportunity to grow. Good jumping! |